Installing Java, Oracle 11g R2 Express Edition and SQL Developer on Ubuntu/Mint 64-bit
Installing Java
We start with installing Java on the machine. My personal preference is to use Oracle Java JDK. Installing this JDK could be done easily by performing the following statements.
sudo add-apt-repository ppa:webupd8team/java
sudo apt-get update
sudo apt-get install oracle-java7-installer
Notice::
You can change version from “oracle-java7-installer” to “oracle-java6-installer” or “oracle-java8-installer” .. as you want 🙂
The screen in figure 1 will appear in the terminal, hit enter to proceed. After this, the screen in figure 2 will be shown. Navigate to <Yes> using the left arrow on your keyboard and hit enter. Oracle JDK 7 will be installed.


To validate the Java installation, execute the following command:
java -version
This should result in the following (or something similar).
java version “1.7.0_51”
Java(TM) SE Runtime Environment (build 1.7.0_51-b13)
Java HotSpot(TM) 64-Bit Server VM (build 24.51-b03, mixed mode)
The next next step is to set the JAVA_HOME environment variable. To do this, open the /etc/bash.bashrc file by executing the following statement.
sudo gedit /etc/bash.bashrc
Scroll to the bottom of the file and add the following lines
export JAVA_HOME=/usr/lib/jvm/java-7-oracle
export PATH=$JAVA_HOME/bin:$PATH
Save the file and close the editor. To load the changes, execute the following statement.
source /etc/bash.bashrc
To validate the changes you can execute the following statement.
echo $JAVA_HOME
The result of this statement should be the following.
/usr/lib/jvm/java-7-oracle
Installing Oracle 11g R2 Express Edition
For the installation of Oracle 11g R2 Express Edition (XE), a couple of additional Linux packages are required. These packages can be installed by executing the following statement.
sudo apt-get install alien libaio1 unixodbc
The next step is to download the Oracle 11g R2 Express Edition from the Oracle website. Make sure you select the Linux x64 version from http://www.oracle.com/technetwork/products/express-edition/downloads/index.html. After the download is completed, open the terminal and navigate to the download directory. In my case this can be done by executing the following statement.
cd Downloads
The next step step is to unzip the downloaded file. To do this, execute the following command.
unzip oracle-xe-11.2.0-1.0.x86_64.rpm.zip
A new directory (Disk1) is added to the Download directory. Navigate to this directory:
cd Disk1
ow we have to convert the Red Hat package (rpm) to a Debian package. This may be done using the alien command. The -d parameter is used to inform alien that a Debian package should be generated. When the -scripts parameter is toggled, alien will try to convert the scripts that are meant to be run when the package is installed and removed.
sudo alien --scripts -d oracle-xe-11.2.0-1.0.x86_64.rpm
This step may take a while, while this statement is executing we can do the following steps. Open a new terminal window for these steps.
The Red Hat package, relies on the /sbin/chkconfig file, which is not used in Ubuntu. To successfully install Oracle XE we use a simple trick. Start by creating a custom /sbin/chkconfig file by executing the following statement.
sudo gedit /sbin/chkconfig
Copy and paste the following into the editor:
#!/bin/bash
# Oracle 11gR2 XE installer chkconfig hack for Ubuntu
file=/etc/init.d/oracle-xe
if [[ ! `tail -n1 $file | grep INIT` ]]; then
echo >> $file
echo '### BEGIN INIT INFO' >> $file
echo '# Provides: OracleXE' >> $file
echo '# Required-Start: $remote_fs $syslog' >> $file
echo '# Required-Stop: $remote_fs $syslog' >> $file
echo '# Default-Start: 2 3 4 5' >> $file
echo '# Default-Stop: 0 1 6' >> $file
echo '# Short-Description: Oracle 11g Express Edition' >> $file
echo '### END INIT INFO' >> $file
fi
update-rc.d oracle-xe defaults 80 01
#EOF
Save the file and close the editor. Now we have to provide the file with the appropriate execution privileges.
sudo chmod 755 /sbin/chkconfig
After this, we have to create the file /etc/sysctl.d/60-oracle.conf to set the additional kernel parameters. Open the file by executing the following statement.
sudo gedit /etc/sysctl.d/60-oracle.conf
Copy and paste the following into the file. Kernel.shmmax is the maximum possible value of physical RAM in bytes. 536870912 / 1024 /1024 = 512 MB.
Notice::
if your RAM is 8G
calculate you 8G RAM by … 8*1024*1024*1024=8589934592
# Oracle 11g XE kernel parameters
fs.file-max=6815744
net.ipv4.ip_local_port_range=9000 65000
kernel.sem=250 32000 100 128
kernel.shmmax=536870912
Save the file. The changes in this file may be verified by executing:
sudo cat /etc/sysctl.d/60-oracle.conf
Load the kernel parameters:
sudo service procps start
The changes may be verified again by executing:
sudo sysctl -q fs.file-max
This method should return the following:
fs.file-max = 6815744 |
After this, execute the following statements to make some more required changes:
sudo ln -s /usr/bin/awk /bin/awk
mkdir /var/lock/subsys
touch /var/lock/subsys/listener
Close the second terminal window and return to the first terminal window. The rpm package should be converted and a new file called oracle-xe-11.2.0-2_amd64.deb have been generated. To run this file, execute the following command:
sudo dpkg --install oracle-xe_11.2.0-2_amd64.deb
Execute the following to avoid getting a ORA-00845: MEMORY_TARGET error. Note: replace “size=4096m” with the size of your (virtual) machine’s RAM in MBs.
sudo rm -rf /dev/shm
sudo mkdir /dev/shm
sudo mount -t tmpfs shmfs -o size=4096m /dev/shm
Create the file /etc/rc2.d/S01shm_load.
sudo gedit /etc/rc2.d/S01shm_load
Copy and paste the following in the file. Note: replace “size=4096m” with the size of your machine’s RAM in MBs.
#!/bin/sh
case "$1" in
start) mkdir /var/lock/subsys 2>/dev/null
touch /var/lock/subsys/listener
rm /dev/shm 2>/dev/null
mkdir /dev/shm 2>/dev/null
mount -t tmpfs shmfs -o size=4096m /dev/shm ;;
*) echo error
exit 1 ;;
esac
Save the file, close the editor and provide the appropriate execution privileges.
sudo chmod 755 /etc/rc2.d/S01shm_load
Configuring Oracle 11g R2 Express Edition
If you have successfully installed to Oracle 11g R2 Express Edition server, it’s time to configure the server. To start the configuration of the server, execute the following command and follow the “wizard” in the terminal. Default values are shown between brackets for each question.
sudo /etc/init.d/oracle-xe configure
Now it is time to set-up some environmental variables. Open the /etc/bash.bashrc file by executing the following statement:
sudo gedit /etc/bash.bashrc
Scroll to the bottom of the file and add the following lines.
export ORACLE_HOME=/u01/app/oracle/product/11.2.0/xe
export ORACLE_SID=XE
export NLS_LANG=`$ORACLE_HOME/bin/nls_lang.sh`
export ORACLE_BASE=/u01/app/oracle
export LD_LIBRARY_PATH=$ORACLE_HOME/lib:$LD_LIBRARY_PATH
export PATH=$ORACLE_HOME/bin:$PATH
Save the file and close the editor. To load the changes, execute the following statement:
source /etc/bash.bashrc
To validate the changes you can execute the following statement.
echo $ORACLE_HOME
/u01/app/oracle/product/11.2.0/xe
After this step it is recommended to reboot the machine. After the reboot is completed, you should be able to start the Oracle server using the following command:
sudo service oracle-xe start
A file named oraclexe-gettingstarted.desktop is placed on your desktop. To make this file executable, navigate to you desktop.
cd ~/Desktop
To make the file executable, execute the following statement.
sudo chmod a+x oraclexe-gettingstarted.desktop
Installing SQL Developer /Tow Method
#Method 1
Finally, after the installation of Oracle 11g R2 Express Edition and Java, SQL Developer could be installed. This is done by performing the following steps.
Download Oracle SQL Developer from the Oracle site. Select the Linux RPM package: http://www.oracle.com/technetwork/developer-tools/sql-developer/downloads/index.html. Open a terminal window and navigate to the Download directory:
cd Downloads
Convert the Red Hat package to a Ubuntu package. Note: this may take a while.
sudo alien --scripts -d sqldeveloper-4.0.0.13.80-1.noarch.rpm
A file named sqldeveloper_4.0.0.13.80-2_all.deb will be generated. To run this file, execute the following statement:
sudo dpkg --install sqldeveloper_4.0.0.13.80-2_all.deb
Create a .sqldeveloper directory in your home folder:
sudo mkdir /home/.sqldeveloper/
Run SQL Developer from the terminal.
sudo /opt/sqldeveloper/sqldeveloper.sh
Now enter the full Java path. In my case this is done as follows:
/usr/lib/jvm/java-7-oracle
These steps worked for me to install Oracle XE and SQL Developer on Ubuntu 64-bit, and have been validated by one of my colleagues. I am curious to know if it worked for you. Please also let me know if you find any mistakes or have any additions to make this script better.
——
#Method 2
o get the SQLDeveloper download, you will need an Oracle Technet account. Fortunately, this is free.
You can do this by going to the Technet Home Page.
Once you’re set up, go to the SQLDeveloper Downloads Page.
There are a couple of things to note here.
First, the package you need to download is labelled Other Platforms.
Secondly, if you do happen to look at the Release instructions for this package, it will mention JDK 1.6.0_11 or above.
These instructions are out of date in this regard and refer to the previous version of SQLDeveloper.
Anyway, on the download page, click accept License Agreement and click on the Other Platforms Download.

At this point, you may be asked to re-enter your Technet credentials.
When prompted by Mint, save the file.
Once completed, go to the Downloads directory and you should see…
cd $HOME/Downloads
ls sqldeveloper-4.0.1.14.48-no-jre.zip
sqldeveloper-4.0.1.14.48-no-jre.zip
INSTALLING SQLDEVELOPER4
We’re going to install SQLDeveloper under /opt so…
sudo mkdir /opt/sqldeveloper4
Now to copy and extract the zip file …
sudo cp $HOME/Downloads/sqldeveloper-4.0.1.14.48-no-jre.zip /opt/sqldeveloper4/
cd /opt/sqldeveloper4
sudo unzip sqldeveloper-4.0.1.14.48-no-jre.zip
Once completed, we’re now ready to finalise the configuration.
Setting the Java Path for SQLDeveloper
To do this, we simply need to run SQLDeveloper. The first time it starts, it will ask for a path to the JDK.
This will be the path we figured out earlier. So…
cd /opt/sqldeveloper4/sqldeveloper
sudo chmod a+x sqldeveloper.sh
./sqldeveloper.sh
When we execute the shell script to start SQLDeveloper we’ll get SQLDeveloper SCREEN …
At this point, we enter the path, minus the bin directory (which SQLDeveloper will look in automatically) :
Now request v of java ..
Open terminal else and type:
echo $JAVA_HOME
Return like ..
/usr/lib/jvm/java-7-oracle
copy returned value to path request ..
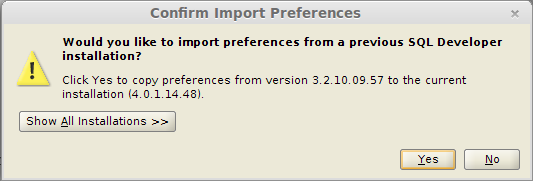
If you have a previous version of SQLDeveloper installed, you will be asked if you want to copy all the settings, connections etc to the latest version :
Finally, SQLDeveloper will start.
Adding SQLDeveloper4 to the Cinnamon Menu
To add SQLDeveloper to the menu…
Right-click the Menu in the bottom left corner of the screen and select Configure :

Click the Open the menu editor button.

Select New Item
Name : SQLDeveloper4.0.1
Command : /opt/sqldeveloper4/sqldeveloper/sqldeveloper.sh
Click on the rocket icon and select the sqldeveloper icon at :
/opt/sqldeveloper4/sqldeveloper
Now you should see the SQLDeveloper4.0.1 option under the Programming Menu.
After all that, I feel like a cup of coffee. Now where did I leave that Sonic Screwdriver…
Good luck! .. 🙂
![Oracle APEX | How to avoid insert same values into tabular form [JS Client side] ?](https://howoracleapex.com/wp-content/themes/hueman/assets/front/img/thumb-medium-empty.png)